2026/1/21大约 16 分钟
物联网APP最小系统开发
新建项目
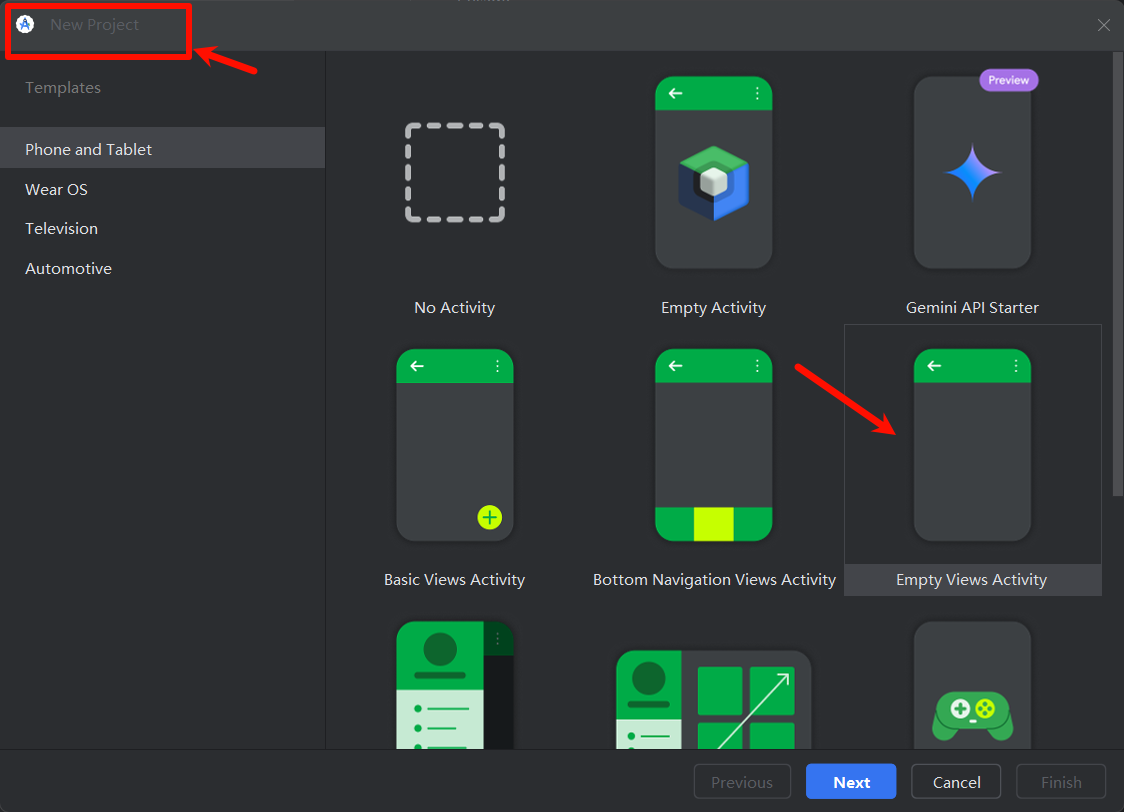
项目设置
根据你的项目填写,最后点击右下角Finish
下面所有内容都以API29进行讲解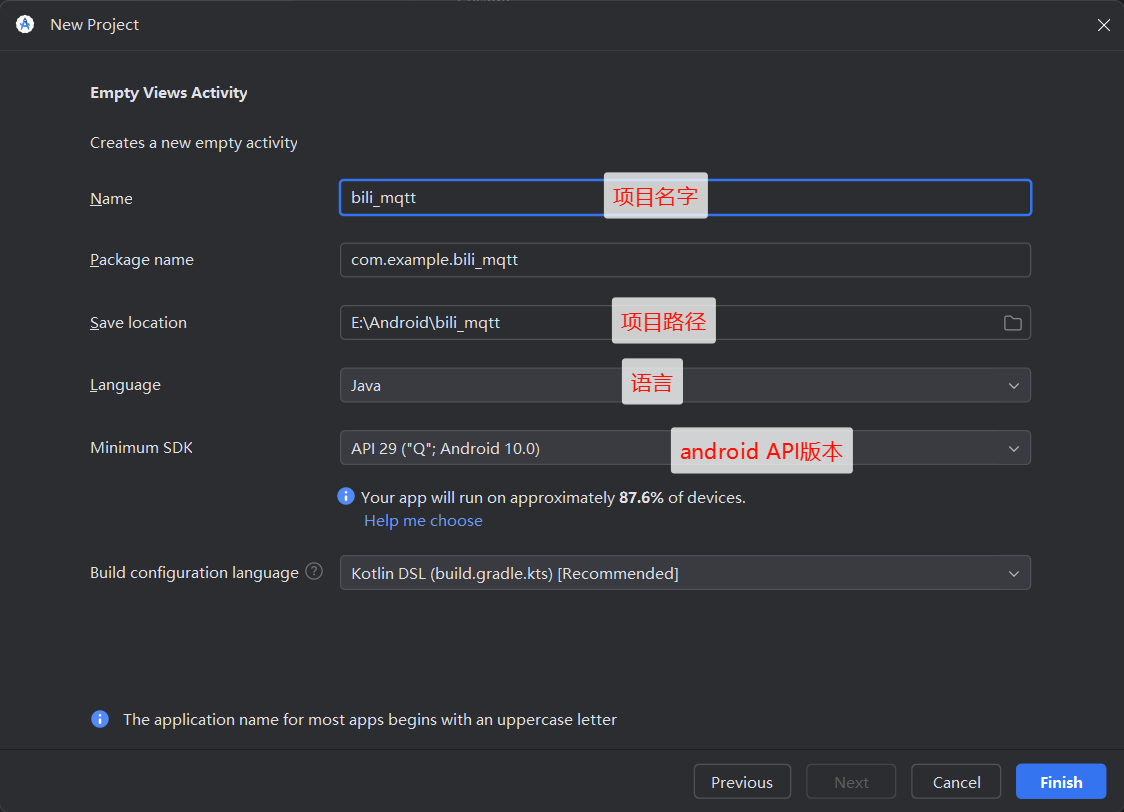
视图介绍
Project视图-目录介绍
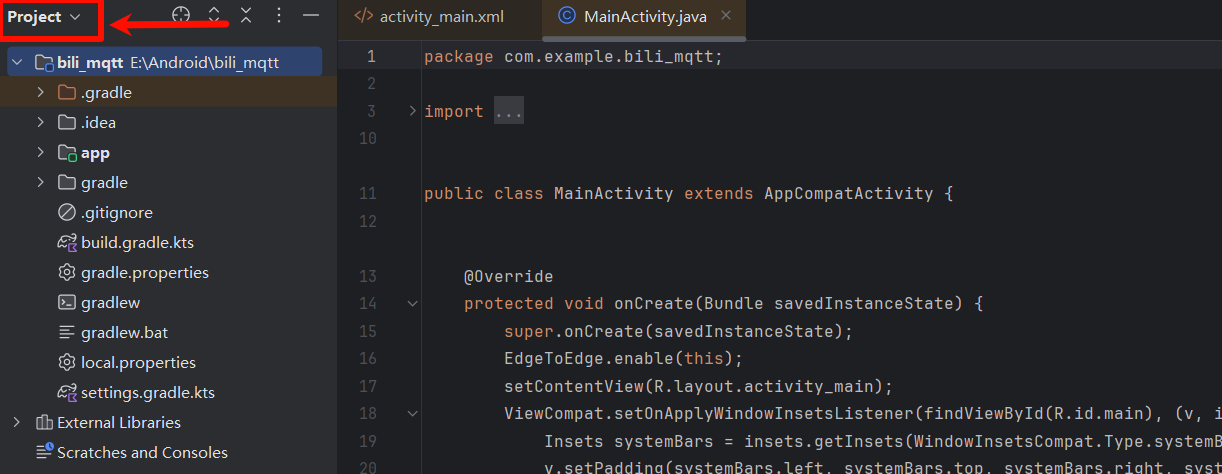
- bili_mqtt :这是整个项目的根目录,名称为“bili_mqtt”,位于路径E:\Android\bili_mqtt。
- .gradle :这是一个隐藏文件夹,用于存储Gradle构建系统的缓存数据和设置。它通常包含与项目构建相关的临时文件和配置。
- .idea :这也是一个隐藏文件夹,由IntelliJ IDEA(包括Android Studio)生成,用于存储项目的IDE特定设置,如代码样式、运行配置等。
- app:这是项目的主要模块目录,包含了应用的源代码、资源文件和其他相关配置。在Android项目中,通常至少会有一个名为“app”的模块。
- gradle :该文件夹存放了Gradle相关的脚本和配置文件,用于项目的构建和管理。
- .gitignore :这是一个文本文件,用于指定Git版本控制系统应该忽略不跟踪的文件或文件类型,比如编译输出、临时文件等。
- build.gradle.kts :这是使用Kotlin DSL编写的Gradle构建脚本,定义了项目的构建配置,如依赖项、插件、构建任务等。
- gradle.properties :这是一个属性文件,可以用来定义Gradle构建时使用的全局属性和变量。
- gradlew 和 gradlew.bat :这两个是Gradle的Wrapper脚本,分别用于Linux/Mac和Windows系统,允许开发者无需安装Gradle即可执行构建操作。
- local.properties :这个文件通常包含本地开发环境的配置信息,如SDK路径等,不会被提交到版本控制系统中。
- settings.gradle.kts :这是使用Kotlin DSL编写的Gradle设置脚本,用于定义多项目构建中的子项目和依赖关系。
app文件内容
目录内容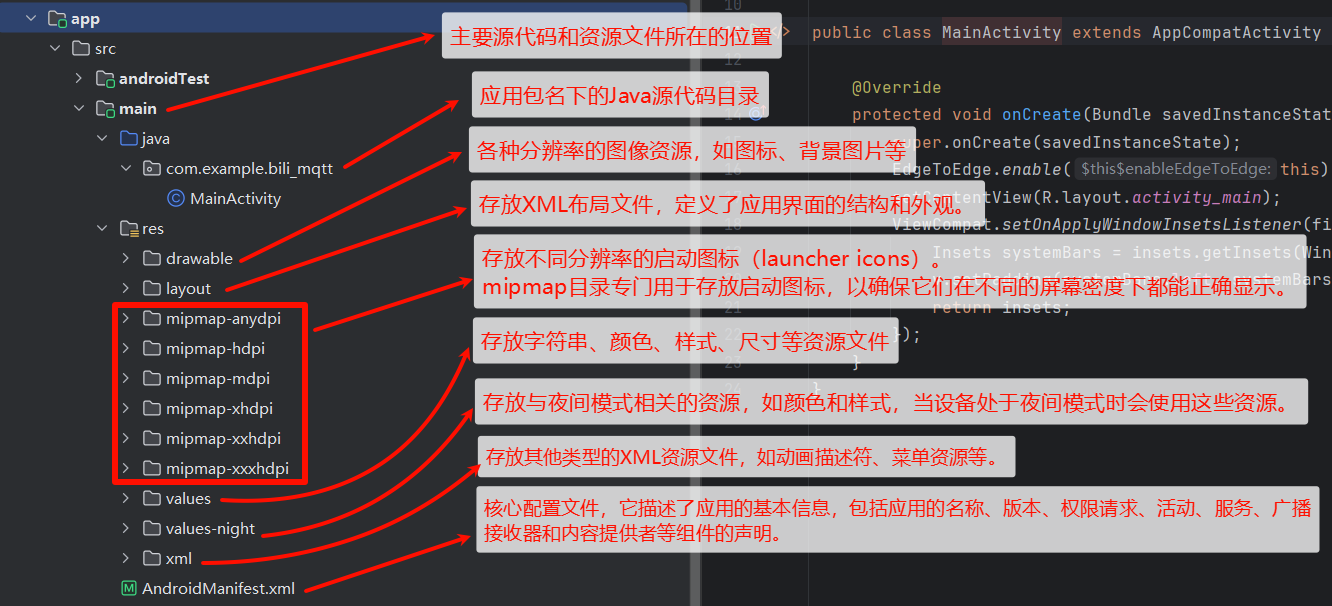
主要文件介绍
MainActivity
相当于c语言中的main函数,前端后端中的后端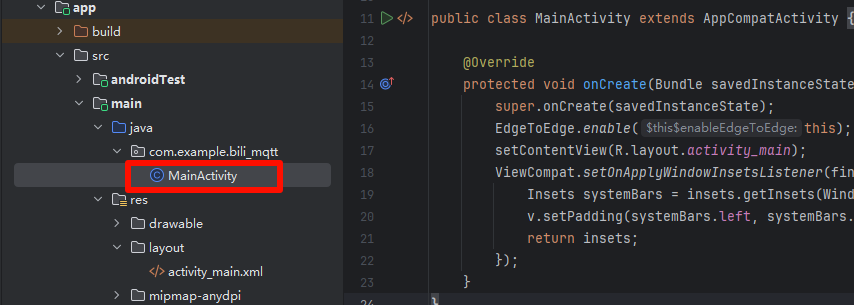
// 定义当前类属于的包名。包名用于组织代码,也决定了 app 的唯一标识。
package com.example.bili_mqtt;
// import 类似于c语言中的include,等效于python中的import
import android.os.Bundle;
// 导入 Android 和 Jetpack 的一些类,用于构建界面、处理窗口边界、设置界面适配等。
import androidx.activity.EdgeToEdge;
import androidx.appcompat.app.AppCompatActivity;
import androidx.core.graphics.Insets;
import androidx.core.view.ViewCompat;
import androidx.core.view.WindowInsetsCompat;
// 这是一个继承自 AppCompatActivity 的类,表示这是一个主界面(Activity),也就是应用启动后首先展示的界面。
public class MainActivity extends AppCompatActivity {
    // @Override该方法是实现父类的方法
    @Override
    protected void onCreate(Bundle savedInstanceState) {        // 近似于c语言中的创建函数
        super.onCreate(savedInstanceState);                     // 调用父类的 onCreate 方法,传入 savedInstanceState 参数,确保父类的初始化逻辑被执行。
        EdgeToEdge.enable(this);        // 启用边缘到边缘的显示模式(Edge-to-Edge),让内容延伸到状态栏和导航栏的下面,符合现代 Material Design 风格。
        setContentView(R.layout.activity_main);     // 设置当前 Activity 的布局,activity_main.xml 是界面布局文件,位于 res/layout 目录下。

        // 处理系统窗口 Insets(边距)
            // 找到布局中 ID 为 main 的视图(通常是根布局,比如 ConstraintLayout 或 FrameLayout)。
        ViewCompat.setOnApplyWindowInsetsListener(findViewById(R.id.main), (v, insets) -> {
            // systemBars 获取系统栏的边距(比如状态栏高度、导航栏高度)
            Insets systemBars = insets.getInsets(WindowInsetsCompat.Type.systemBars());
            // 设置窗口边距监听器,在系统状态栏、导航栏尺寸变化时自动调整视图的内边距。
            // v.setPadding(...):设置这些边距作为视图的内边距,避免内容被遮挡。
            v.setPadding(systemBars.left, systemBars.top, systemBars.right, systemBars.bottom);
            return insets;
        });
    }
}- 创建一个 Activity 并加载名为
activity_main的界面; - 启用 EdgeToEdge 模式,让界面更现代化;
- 自动根据系统状态栏/导航栏大小调整根视图的内边距,防止内容被遮挡。
activity_main.xml
<?xml version="1.0" encoding="utf-8"?>
// 使用 `ConstraintLayout` 作为根布局
<androidx.constraintlayout.widget.ConstraintLayout xmlns:android="http://schemas.android.com/apk/res/android"
    xmlns:app="http://schemas.android.com/apk/res-auto"
    xmlns:tools="http://schemas.android.com/tools"
    android:id="@+id/main"  // 给这个布局设置 ID,Java 代码中的 findViewById(R.id.main) 就是用这个 ID 找到它的。
    android:layout_width="match_parent"     // 宽高都设为填满父容器(全屏)。
    android:layout_height="match_parent"
    tools:context=".MainActivity">      // 设计时属性,告诉 Android Studio 这是属于哪个 Activity 的界面。不会影响运行,只影响预览。

    <TextView
        android:layout_width="wrap_content"     // layout_width 和 layout_height 设置为 wrap_content,表示宽高适应文字内容。
        android:layout_height="wrap_content"
        android:text="Hello World!"     // 设置显示的文字内容。

        // 使用约束方式让 TextView 居中于整个屏幕(上下左右都绑定到父布局 ConstraintLayout)。
        app:layout_constraintBottom_toBottomOf="parent"
        app:layout_constraintEnd_toEndOf="parent"
        app:layout_constraintStart_toStartOf="parent"
        app:layout_constraintTop_toTopOf="parent" />

</androidx.constraintlayout.widget.ConstraintLayout>
MQTT_App开发
添加库文件
在\app\src\main\res新建文件夹MyLib
把MQTT库拖进该文件夹,右键将其作为库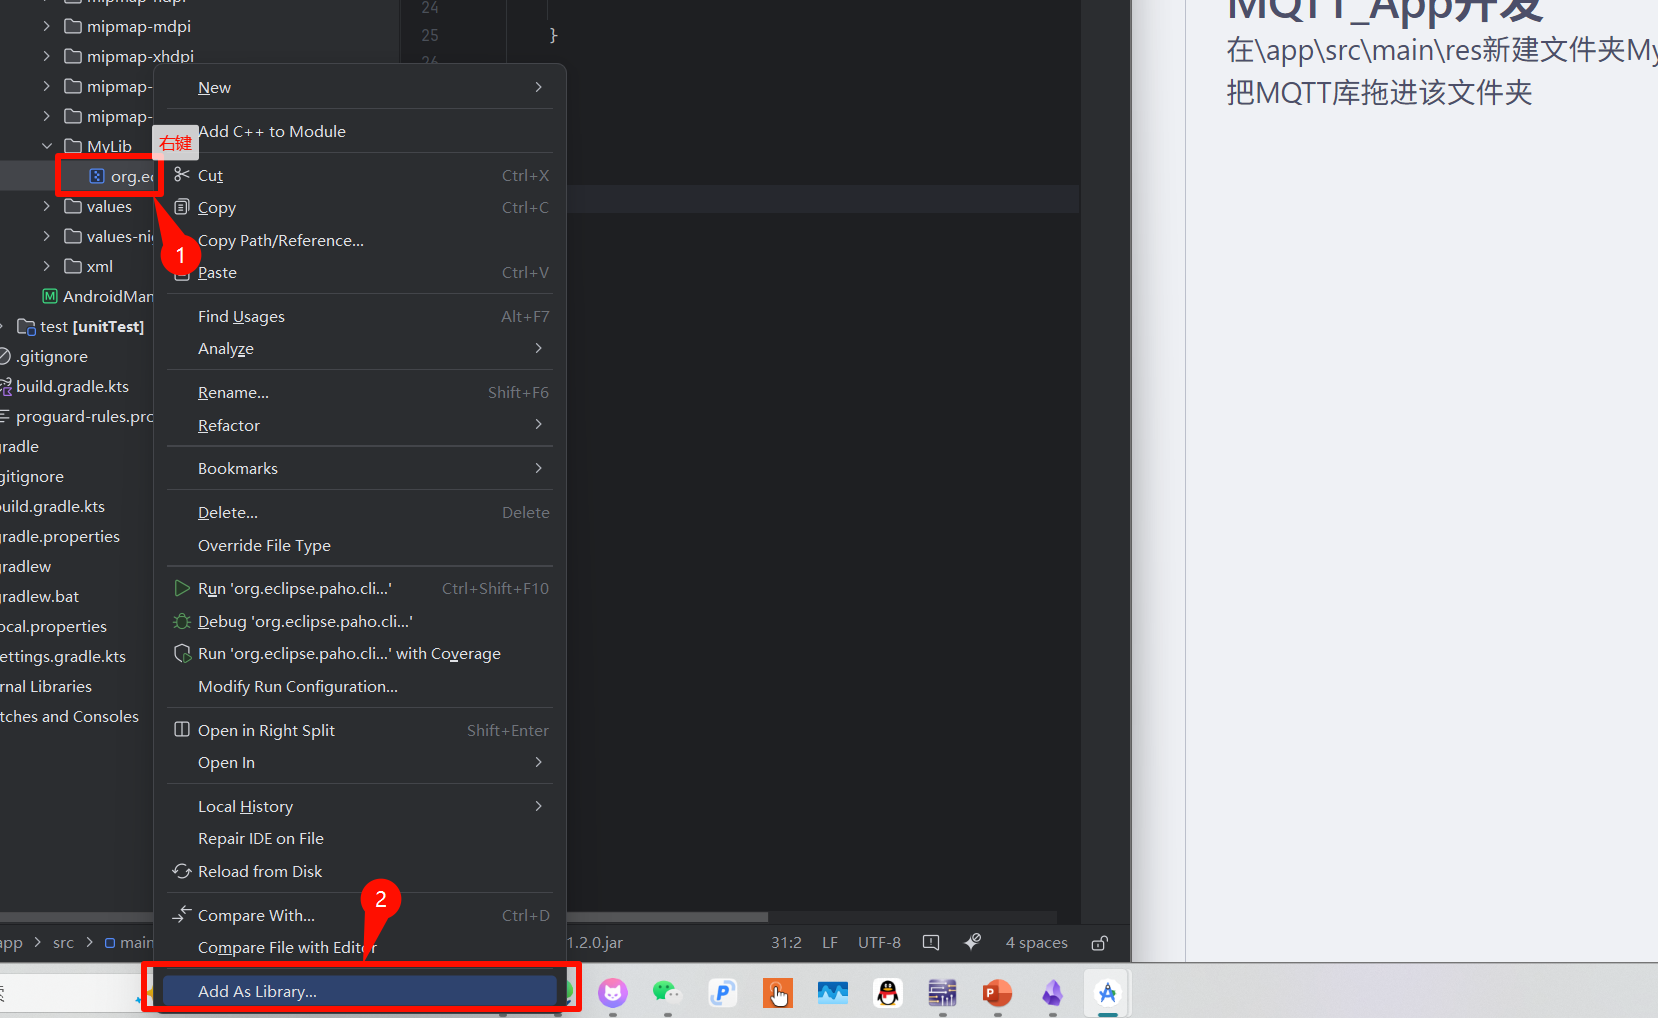
可观察到\app\build.gradle.kts已经添加该库
dependencies {

    implementation(libs.appcompat)
    implementation(libs.material)
    implementation(libs.activity)
    implementation(libs.constraintlayout)
    implementation(files("src\\main\\res\\MyLib\\org.eclipse.paho.client.mqttv3-1.2.0.jar"))
    testImplementation(libs.junit)
    androidTestImplementation(libs.ext.junit)
    androidTestImplementation(libs.espresso.core)
}
开启网络权限
在\app\src\main\AndroidManifest.xml文件中添加网络权限
<!--    INTERNET:允许应用访问互联网-->
<uses-permission android:name="android.permission.INTERNET"/>
<!--    ACCESS_NETWORK_STATE:允许应用查看网络状态,比如判断当前是否联网。-->
<uses-permission android:name="android.permission.ACCESS_NETWORK_STATE"/>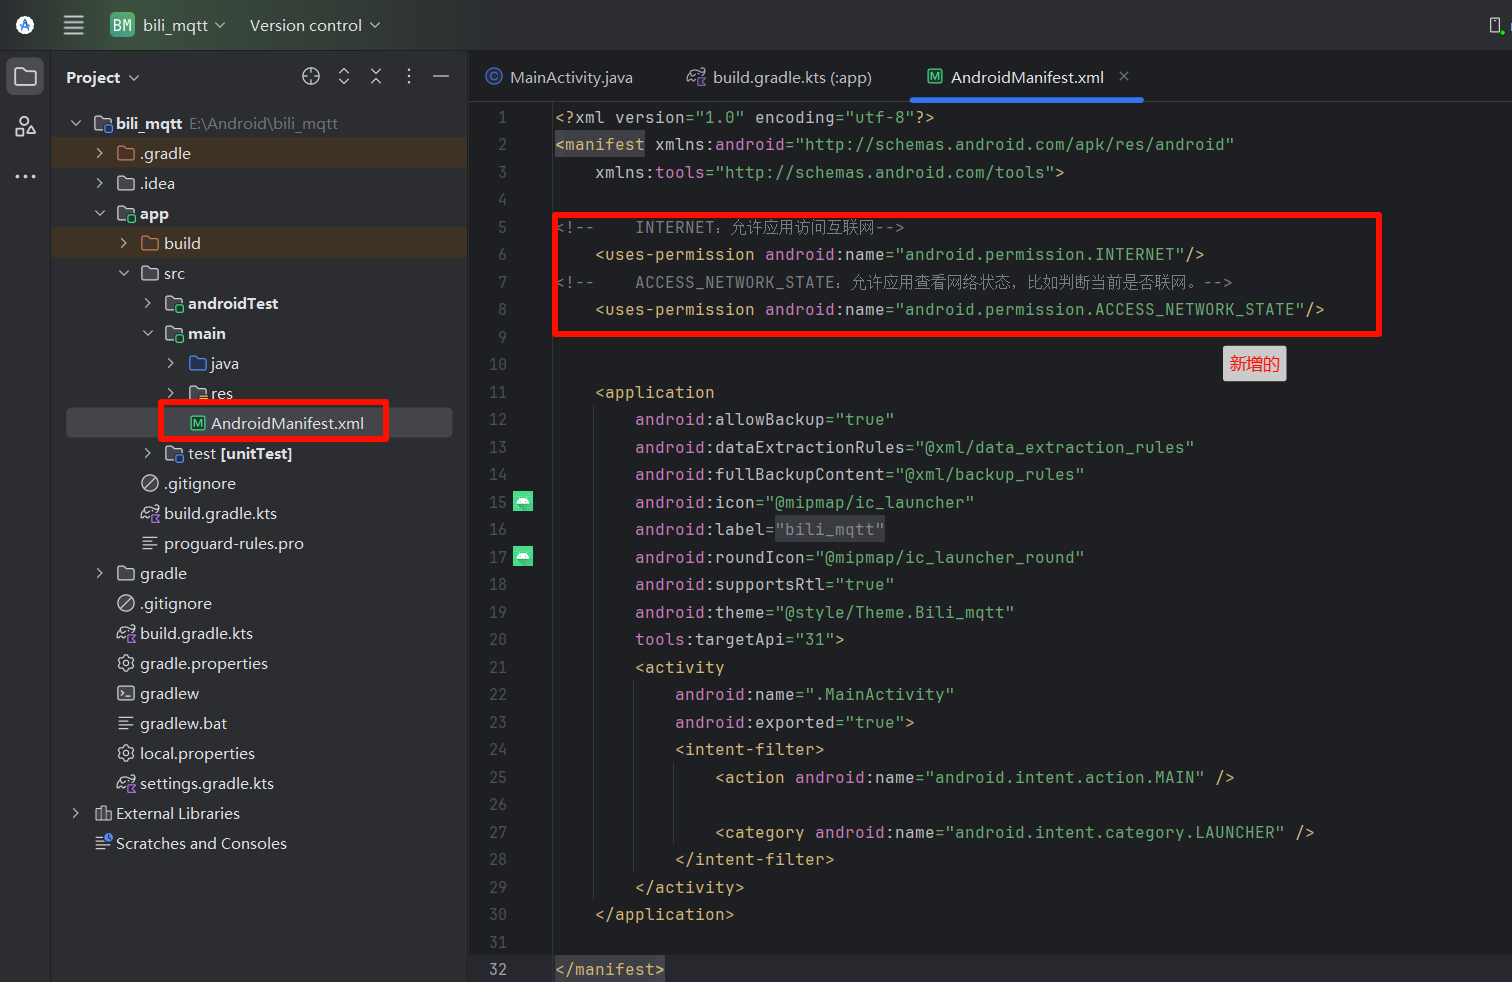
前端页面编写
主要代码讲解
TextView-文本控件
<TextView
    android:layout_width="wrap_content"
    android:layout_height="wrap_content"
    android:layout_marginLeft="100dp"
    android:layout_marginTop="16dp"
    android:text="Fsallen 的MQTT手机程序"
android:textSize="20sp" />| 代码 | 解释 |
|---|---|
| android:layout_width="wrap_content" | 让控件大小在宽度上与文本大小匹配 |
| android:layout_height="wrap_content" | 让控件大小在高度上与文本大小匹配 |
| android:layout_marginLeft="100dp" | 离屏幕左边100dp(密度无关像素) |
| android:layout_marginTop="16dp" | 离屏幕上方16dp |
| android:text="Fsallen 的MQTT手机程序" | 文本内容 |
| android:textSize="20sp" | 文本字体大小 |
EditText--输入框控件
<EditText
    android:id="@+id/ip"
    android:layout_width="wrap_content"
    android:layout_height="wrap_content"
    android:hint="服务器IP                         "
    android:textColor="#767676"
    android:textSize="15sp"
    android:layout_marginTop="65dp"
android:layout_marginLeft="180dp" />| 代码 | 解释 |
|---|---|
| android:id="@+id/ip" | 文件唯一标识,后端代码根据id找到控件 |
| android:hint="服务器IP | 输入的提示文本 |
| android:textColor="#767676" | 提示文本颜色(灰色) |
按钮控件
<Button
    android:id="@+id/connect"
    android:layout_width="wrap_content"
    android:layout_height="wrap_content"
    android:text="连接服务器"
    android:layout_marginLeft="80dp"
    android:layout_marginTop="242dp"/>
完整代码
这里我们使用相对布局RelativeLayout
<?xml version="1.0" encoding="utf-8"?>

<RelativeLayout xmlns:android="http://schemas.android.com/apk/res/android"
    xmlns:app="http://schemas.android.com/apk/res-auto"
    xmlns:tools="http://schemas.android.com/tools"
    android:id="@+id/main"
    android:layout_width="match_parent"
    android:layout_height="match_parent"
    tools:context=".MainActivity">

    <TextView
        android:layout_width="wrap_content"
        android:layout_height="wrap_content"
        android:layout_marginLeft="70dp"
        android:layout_marginTop="16dp"
        android:text="Fsallen 的MQTT手机测试程序"
        android:textSize="20sp"/>

    <TextView
        android:layout_width="wrap_content"
        android:layout_height="wrap_content"
        android:layout_marginLeft="20dp"
        android:layout_marginTop="80dp"
        android:text="MQTT服务器: "/>
    <EditText
        android:id="@+id/ip"
        android:layout_width="wrap_content"
        android:layout_height="wrap_content"
        android:hint="服务器IP                                       "
        android:textColor="#767676"
        android:textSize="15sp"
        android:layout_marginTop="65dp"
        android:layout_marginLeft="120dp" />

    <TextView
        android:layout_width="wrap_content"
        android:layout_height="wrap_content"
        android:layout_marginLeft="20dp"
        android:layout_marginTop="110dp"
        android:text="客户端id: "/>
    <EditText
        android:id="@+id/id"
        android:layout_width="wrap_content"
        android:layout_height="wrap_content"
        android:hint="客户端ID                                      "
        android:textColor="#767676"
        android:textSize="15sp"
        android:layout_marginTop="95dp"
        android:layout_marginLeft="120dp" />

    <TextView
        android:layout_width="wrap_content"
        android:layout_height="wrap_content"
        android:layout_marginLeft="20dp"
        android:layout_marginTop="140dp"
        android:text="用户名: "/>
    <EditText
        android:id="@+id/usename"
        android:layout_width="wrap_content"
        android:layout_height="wrap_content"
        android:hint="用户名                                          "
        android:textColor="#767676"
        android:textSize="15sp"
        android:layout_marginTop="125dp"
        android:layout_marginLeft="120dp" />

    <TextView
        android:layout_width="wrap_content"
        android:layout_height="wrap_content"
        android:layout_marginLeft="20dp"
        android:layout_marginTop="170dp"
        android:text="密码: "/>
    <EditText
        android:id="@+id/passwd"
        android:layout_width="wrap_content"
        android:layout_height="wrap_content"
        android:hint="密码                                               "
        android:textColor="#767676"
        android:textSize="15sp"
        android:layout_marginTop="155dp"
        android:layout_marginLeft="120dp"/>

    <Button
        android:id="@+id/connect"
        android:layout_width="wrap_content"
        android:layout_height="wrap_content"
        android:text="连接服务器"
        android:layout_marginLeft="130dp"
        android:layout_marginTop="220dp"
         />
    <TextView
        android:layout_width="wrap_content"
        android:layout_height="wrap_content"
        android:layout_marginLeft="80dp"
        android:layout_marginTop="340dp"
        android:text="订阅话题: "/>
    <EditText
        android:id="@+id/topic"
        android:layout_width="wrap_content"
        android:layout_height="wrap_content"
        android:hint="话题                            "
        android:textColor="#767676"
        android:textSize="15sp"
        android:layout_marginLeft="150dp"
        android:layout_marginTop="320dp" />

    <Button
        android:id="@+id/subscribe"
        android:layout_width="wrap_content"
        android:layout_height="wrap_content"
        android:text="订阅"
        android:layout_marginLeft="161dp"
        android:layout_marginTop="371dp"/>

    <TextView
        android:layout_width="wrap_content"
        android:layout_height="wrap_content"
        android:layout_marginLeft="80dp"
        android:layout_marginTop="430dp"
        android:text="话题内容: "/>

    <TextView
        android:id="@+id/message"
        android:layout_width="165dp"
        android:layout_height="22dp"
        android:layout_marginLeft="160dp"
        android:layout_marginTop="430dp"
        android:text="未收到信息"/>
    <TextView
        android:layout_width="wrap_content"
        android:layout_height="wrap_content"
        android:layout_marginLeft="80dp"
        android:layout_marginTop="490dp"
        android:text="发布话题: "/>
    <EditText
        android:id="@+id/topic_pub"
        android:layout_width="wrap_content"
        android:layout_height="wrap_content"
        android:hint="话题                            "
        android:textColor="#767676"
        android:textSize="15sp"

        android:layout_marginLeft="150dp"
        android:layout_marginTop="475dp" />
    <TextView
        android:layout_width="wrap_content"
        android:layout_height="wrap_content"
        android:layout_marginLeft="80dp"
        android:layout_marginTop="520dp"
        android:text="话题内容: "/>
    <EditText
        android:id="@+id/topic_pub_message"
        android:layout_width="wrap_content"
        android:layout_height="wrap_content"
        android:hint="话题内容                     "
        android:textColor="#767676"
        android:textSize="15sp"

        android:layout_marginLeft="150dp"
        android:layout_marginTop="505dp" />
    <Button
        android:id="@+id/publish"
        android:layout_width="wrap_content"
        android:layout_height="wrap_content"
        android:text="发布"
        android:layout_marginLeft="161dp"
        android:layout_marginTop="560dp"/>

    <TextView
        android:layout_width="wrap_content"
        android:layout_height="wrap_content"
        android:layout_marginLeft="220dp"
        android:layout_marginTop="650dp"
        android:text="by--B站Fsallen"
        android:textSize="20sp"

 />
    <TextView
        android:layout_width="wrap_content"
        android:layout_height="wrap_content"
        android:layout_marginLeft="270dp"
        android:layout_marginTop="680dp"
        android:text="2025-6-6"
        android:textSize="20sp"

 />
</RelativeLayout>
编写后端代码
代码结构
导入包

public class MainActivity extends AppCompatActivity {
    定义必要变量
    protected void onCreate(Bundle savedInstanceState) {
        初始化控件
        设置默认值
        连接服务器按键回调{
            逻辑处理
        }
        订阅话题按键回调{
            逻辑处理
        }
        发布信息按键回调{
            逻辑处理
        }
    }
    MQTT相关函数(){
    }
}
MQTT相关函数
MQTT初始化
private void Mqtt_init(){
    try {
        client = new MqttClient(host, client_id,
                new MemoryPersistence());
        //MQTT的连接设置
        options = new MqttConnectOptions();
        //设置是否清空session,这里如果设置为false表示服务器会保留客户端的连接记录,这里设置为true表示每次连接到服务器都以新的身份连接
        options.setCleanSession(false);
        //设置连接的用户名
        options.setUserName(userName);
        //设置连接的密码
        options.setPassword(passWord.toCharArray());
        // 设置超时时间 单位为秒
        options.setConnectionTimeout(10);
        // 设置会话心跳时间 单位为秒 服务器会每隔1.5*20秒的时间向客户端发送个消息判断客户端是否在线,但这个方法并没有重连的机制
        options.setKeepAliveInterval(20);
        //设置回调
        client.setCallback(new MqttCallback() {
            @Override
            public void connectionLost(Throwable cause) {
                //连接丢失后,一般在这里面进行重连
                System.out.println("connectionLost----------");
                //startReconnect();
            }
            @Override
            public void deliveryComplete(IMqttDeliveryToken token) {
                //publish后会执行到这里
                System.out.println("deliveryComplete---------"
                        + token.isComplete());
            }
            @Override
            public void messageArrived(String topicName, MqttMessage message)
                    throws Exception {
                //subscribe后得到的消息会执行到这里面
                System.out.println("messageArrived----------");
                Message msg = new Message();
                msg.what = 3;   //收到消息标志位
                msg.obj = topicName + "---" + message.toString();
                handler.sendMessage(msg);    // hander 回传
            }
        });
    } catch (Exception e) {
        e.printStackTrace();
    }
}
连接MQTT
private void Mqtt_connect() {
    new Thread(new Runnable() {
        @Override
        public void run() {
            try {
                if(!(client.isConnected()) )  //如果还未连接
                {
                    client.connect(options);
                    Message msg = new Message();
                    msg.what = 31;
                    handler.sendMessage(msg);
                }
            } catch (Exception e) {
                e.printStackTrace();
                Message msg = new Message();
                msg.what = 30;
                handler.sendMessage(msg);
            }
        }
    }).start();
}
开启连接
private void startReconnect() {
    scheduler = Executors.newSingleThreadScheduledExecutor();
    scheduler.scheduleWithFixedDelay(new Runnable() {
        @Override
        public void run() {
            if (!client.isConnected()) {
                Mqtt_connect();
            }
        }
    }, 0 * 1000, 10 * 1000, TimeUnit.MILLISECONDS);
}
订阅话题
private void publishmessageplus(String topic,String message2) throws MqttException {
    if(client==null||!client.isConnected()){
        return;
    }
    MqttMessage message = new MqttMessage();
    message.setPayload(message2.getBytes());
    try {
        client.publish(topic,message);
    }catch (MqttException e){
        e.printStackTrace();
    }
}
主逻辑代码编写
定义必要变量
private MqttClient client;
private String host = "tcp://47.113.191.144:1883";
private String userName = "fs";
private String passWord = "111111";
private String client_id = "18681672301";
private String mqtt_sub_topic = "test_topic";

private MqttConnectOptions options;
private Handler handler;
private ScheduledExecutorService scheduler;
获取控件
获取输入框,按键控件,用来处理与他们相关的逻辑,比如获取输入栏的文本,编写按键回调函数
EditText editText_IP = findViewById(R.id.ip);
EditText editText_usename = findViewById(R.id.usename);
EditText editText_client_id = findViewById(R.id.id);
EditText editText_passwd = findViewById(R.id.passwd);
EditText editText_topic = findViewById(R.id.topic);
TextView textView = findViewById(R.id.message)

EditText editText_publish = findViewById(R.id.topic_pub);
EditText editText_topic_pub_message = findViewById(R.id.topic_pub_message);
设置默认值
editText_IP.setText(host);
editText_usename.setText(userName);
editText_client_id.setText(client_id);
editText_passwd.setText(passWord);
editText_topic.setText(mqtt_sub_topic);
连接服务器代码编写
// 找到负责连接服务器的按钮
        Button btnConnect = findViewById(R.id.connect);
        // 编写按键按下回调函数
        btnConnect.setOnClickListener(new View.OnClickListener() {
            @Override
            public void onClick(View v) {
                // 点击按钮后的操作
                // 获取新值
                Toast.makeText(MainActivity.this, "正在初始化MQTT。。。", Toast.LENGTH_SHORT).show();
                // 获取输入框的文本并转为字符串,供Mqtt_init();使用
                host = editText_IP.getText().toString();
                userName = editText_usename.getText().toString();
                passWord = editText_passwd.getText().toString();
                client_id = editText_client_id.getText().toString();
                Mqtt_init();
                Toast.makeText(MainActivity.this, "正在连接MQTT服务器。。。", Toast.LENGTH_SHORT).show();
                startReconnect();
            }
        });
mqtt状态监听--重点关注
负责接受信息,根据这里的信息进行主要逻辑代码编写,处理mqtt状态
handler = new Handler() {
            @SuppressLint("HandlerLeak")
            public void handleMessage(Message msg){
                super.handleMessage(msg);
                switch (msg.what){
                        case 1: //开机校验更新回传
                            break;
                        case 2:  // 反馈回传
                            break;
                        case 3:  //MQTT接受信息后显示   UTF8Buffer msg=new UTF8Buffer(object.toString());
                            textView.setText(msg.obj.toString());  // 修改 TextView 的文本
                            break;
                        case 30:  //连接失败
                            Toast.makeText(MainActivity.this, "连接失败", Toast.LENGTH_SHORT).show();
                            break;
                        case 31:   //连接成功
                            Toast.makeText(MainActivity.this, "连接成功", Toast.LENGTH_SHORT).show();
                            break;
                        default:
                            break;
                    }
            }
        };
订阅话题代码编写
Button btnsubscribe = findViewById(R.id.subscribe);
        btnsubscribe.setOnClickListener(new View.OnClickListener() {
            @Override
            public void onClick(View v) {
                // 点击按钮后的操作
                if (client == null || !client.isConnected()) {
                    Toast.makeText(MainActivity.this, "请先连接到MQTT服务器", Toast.LENGTH_SHORT).show();
                    return;
                }

                try {
                    client.subscribe(editText_topic.getText().toString(),1);
                    Toast.makeText(MainActivity.this, "订阅成功", Toast.LENGTH_SHORT).show();
                } catch (MqttException e) {
                    Toast.makeText(MainActivity.this, "订阅失败!!!", Toast.LENGTH_SHORT).show();
                    throw new RuntimeException(e);

                }
            }
        });
发布信息代码编写
Button btnpublish = findViewById(R.id.publish);
btnpublish.setOnClickListener(new View.OnClickListener() {
    @Override
    public void onClick(View v) {
        // 点击按钮后的操作
        // 检查服务器是否连接
        if (client == null || !client.isConnected()) {
            Toast.makeText(MainActivity.this, "请先连接到MQTT服务器", Toast.LENGTH_SHORT).show();
            return;
        }
        if(editText_publish.getText().toString().isEmpty() || editText_topic_pub_message.getText().toString().isEmpty()){
            Toast.makeText(MainActivity.this, "话题或话题内容未填写", Toast.LENGTH_SHORT).show();
            return;
        }
        try {
            Toast.makeText(MainActivity.this, "已发布", Toast.LENGTH_SHORT).show();
            publishmessageplus(editText_publish.getText().toString(),editText_topic_pub_message.getText().toString());
        } catch (MqttException e) {
            throw new RuntimeException(e);
        }
    }
});
完整代码
package com.example.bili_mqtt;

import android.annotation.SuppressLint;
import android.os.Bundle;
import android.os.Handler;
import android.os.Message;
import android.widget.Button;
import android.view.View;
import android.widget.EditText;
import android.widget.TextView;
import android.widget.Toast;


import androidx.activity.EdgeToEdge;
import androidx.appcompat.app.AppCompatActivity;
import androidx.core.graphics.Insets;
import androidx.core.view.ViewCompat;
import androidx.core.view.WindowInsetsCompat;

import org.eclipse.paho.client.mqttv3.IMqttDeliveryToken;
import org.eclipse.paho.client.mqttv3.MqttCallback;
import org.eclipse.paho.client.mqttv3.MqttClient;
import org.eclipse.paho.client.mqttv3.MqttConnectOptions;
import org.eclipse.paho.client.mqttv3.MqttException;
import org.eclipse.paho.client.mqttv3.MqttMessage;
import org.eclipse.paho.client.mqttv3.persist.MemoryPersistence;

import java.lang.ref.WeakReference;
import java.util.concurrent.Executors;
import java.util.concurrent.ScheduledExecutorService;
import java.util.concurrent.TimeUnit;

public class MainActivity extends AppCompatActivity {
    private MqttClient client;
    private String host = "tcp://47.113.191.144:1883";
    private String userName = "fs";
    private String passWord = "111111";
    private String client_id = "272935657";
    private String mqtt_sub_topic = "test_topic";

    private MqttConnectOptions options;
    private Handler handler;
    private ScheduledExecutorService scheduler;

    @SuppressLint("HandlerLeak")
    @Override
    protected void onCreate(Bundle savedInstanceState) {
        super.onCreate(savedInstanceState);
        EdgeToEdge.enable(this);
        setContentView(R.layout.activity_main);

        // 先初始化控件
        EditText editText_IP = findViewById(R.id.ip);
        EditText editText_usename = findViewById(R.id.usename);
        EditText editText_client_id = findViewById(R.id.id);
        EditText editText_passwd = findViewById(R.id.passwd);
        EditText editText_topic = findViewById(R.id.topic);
        TextView textView = findViewById(R.id.message);

        EditText editText_publish = findViewById(R.id.topic_pub);
        EditText editText_topic_pub_message = findViewById(R.id.topic_pub_message);
        // 设置默认值
        editText_IP.setText(host);
        editText_usename.setText(userName);
        editText_client_id.setText(client_id);
        editText_passwd.setText(passWord);
        editText_topic.setText(mqtt_sub_topic);

        Button btnConnect = findViewById(R.id.connect);
        btnConnect.setOnClickListener(new View.OnClickListener() {
            @Override
            public void onClick(View v) {
                // 点击按钮后的操作
                // 获取新值
                Toast.makeText(MainActivity.this, "正在初始化MQTT。。。", Toast.LENGTH_SHORT).show();
                host = editText_IP.getText().toString();
                userName = editText_usename.getText().toString();
                passWord = editText_passwd.getText().toString();
                client_id = editText_client_id.getText().toString();

                Mqtt_init();
                Toast.makeText(MainActivity.this, "正在连接MQTT服务器。。。", Toast.LENGTH_SHORT).show();
                 startReconnect();

            }
        });


        Button btnsubscribe = findViewById(R.id.subscribe);
        btnsubscribe.setOnClickListener(new View.OnClickListener() {
            @Override
            public void onClick(View v) {
                // 点击按钮后的操作
                if (client == null || !client.isConnected()) {
                    Toast.makeText(MainActivity.this, "请先连接到MQTT服务器", Toast.LENGTH_SHORT).show();
                    return;
                }

                try {
                    client.subscribe(editText_topic.getText().toString(),1);
                    Toast.makeText(MainActivity.this, "订阅成功", Toast.LENGTH_SHORT).show();
                } catch (MqttException e) {
                    Toast.makeText(MainActivity.this, "订阅失败!!!", Toast.LENGTH_SHORT).show();
                    throw new RuntimeException(e);

                }
            }
        });


        Button btnpublish = findViewById(R.id.publish);
        btnpublish.setOnClickListener(new View.OnClickListener() {
            @Override
            public void onClick(View v) {
                // 点击按钮后的操作
                if (client == null || !client.isConnected()) {
                    Toast.makeText(MainActivity.this, "请先连接到MQTT服务器", Toast.LENGTH_SHORT).show();
                    return;
                }
                if(editText_publish.getText().toString().isEmpty() || editText_topic_pub_message.getText().toString().isEmpty()){
                    Toast.makeText(MainActivity.this, "话题或话题内容未填写", Toast.LENGTH_SHORT).show();
                    return;
                }
                try {
                    Toast.makeText(MainActivity.this, "已发布", Toast.LENGTH_SHORT).show();
                    publishmessageplus(editText_publish.getText().toString(),editText_topic_pub_message.getText().toString());
                } catch (MqttException e) {
                    throw new RuntimeException(e);
                }
            }
        });


        handler = new Handler() {
            @SuppressLint("HandlerLeak")
            public void handleMessage(Message msg) {

                super.handleMessage(msg);
                switch (msg.what){
                    case 1: //开机校验更新回传
                        break;
                    case 2:  // 反馈回传
                        break;
                    case 3:  //MQTT 收到消息回传   UTF8Buffer msg=new UTF8Buffer(object.toString());
                        textView.setText(msg.obj.toString());  // 修改 TextView 的文本
                        break;
                    case 30:  //连接失败
                            Toast.makeText(MainActivity.this, "连接失败", Toast.LENGTH_SHORT).show();
                        break;
                    case 31:   //连接成功
                            Toast.makeText(MainActivity.this, "连接成功", Toast.LENGTH_SHORT).show();
                        break;
                    default:
                        break;
                }
            }

        };


        ViewCompat.setOnApplyWindowInsetsListener(findViewById(R.id.main), (v, insets) -> {
            Insets systemBars = insets.getInsets(WindowInsetsCompat.Type.systemBars());
            v.setPadding(systemBars.left, systemBars.top, systemBars.right, systemBars.bottom);
            return insets;
        });

    }

    // mqtt初始化
    private void Mqtt_init(){
        try {
            client = new MqttClient(host, client_id,
                    new MemoryPersistence());
            //MQTT的连接设置
            options = new MqttConnectOptions();
            //设置是否清空session,这里如果设置为false表示服务器会保留客户端的连接记录,这里设置为true表示每次连接到服务器都以新的身份连接
            options.setCleanSession(false);
            //设置连接的用户名
            options.setUserName(userName);
            //设置连接的密码
            options.setPassword(passWord.toCharArray());
            // 设置超时时间 单位为秒
            options.setConnectionTimeout(10);
            // 设置会话心跳时间 单位为秒 服务器会每隔1.5*20秒的时间向客户端发送个消息判断客户端是否在线,但这个方法并没有重连的机制
            options.setKeepAliveInterval(20);
            //设置回调
            client.setCallback(new MqttCallback() {
                @Override
                public void connectionLost(Throwable cause) {
                    //连接丢失后,一般在这里面进行重连
                    System.out.println("connectionLost----------");
                    //startReconnect();
                }
                @Override
                public void deliveryComplete(IMqttDeliveryToken token) {
                    //publish后会执行到这里
                    System.out.println("deliveryComplete---------"
                            + token.isComplete());
                }
                @Override
                public void messageArrived(String topicName, MqttMessage message)
                        throws Exception {
                    //subscribe后得到的消息会执行到这里面
                    System.out.println("messageArrived----------");
                    Message msg = new Message();
                    msg.what = 3;   //收到消息标志位
                    msg.obj = topicName + "---" + message.toString();
                    handler.sendMessage(msg);    // hander 回传
                }
            });
        } catch (Exception e) {
            e.printStackTrace();
        }
    }
    // 开启连接
    private void Mqtt_connect() {
        new Thread(new Runnable() {
            @Override
            public void run() {
                try {
                    if(!(client.isConnected()) )  //如果还未连接
                    {
                        client.connect(options);
                        Message msg = new Message();
                        msg.what = 31;
                        handler.sendMessage(msg);
                    }
                } catch (Exception e) {
                    e.printStackTrace();
                    Message msg = new Message();
                    msg.what = 30;
                    handler.sendMessage(msg);
                }
            }
        }).start();
    }
    private void startReconnect() {
        scheduler = Executors.newSingleThreadScheduledExecutor();
        scheduler.scheduleWithFixedDelay(new Runnable() {
            @Override
            public void run() {
                if (!client.isConnected()) {
                    Mqtt_connect();
                }
            }
        }, 0 * 1000, 10 * 1000, TimeUnit.MILLISECONDS);
    }
    // 向话题发布
    private void publishmessageplus(String topic,String message2) throws MqttException {
        if(client==null||!client.isConnected()){
            return;
        }
        MqttMessage message = new MqttMessage();
        message.setPayload(message2.getBytes());
        try {
            client.publish(topic,message);
        }catch (MqttException e){
            e.printStackTrace();
        }
    }
}
APP导出
生成正式签名包 (Signed APK) —— 推荐 🔥
特点:这是标准的打包方式,生成的 APK 可以在任何安卓手机上顺利安装,且不会有红色警告。
第1步:打开向导
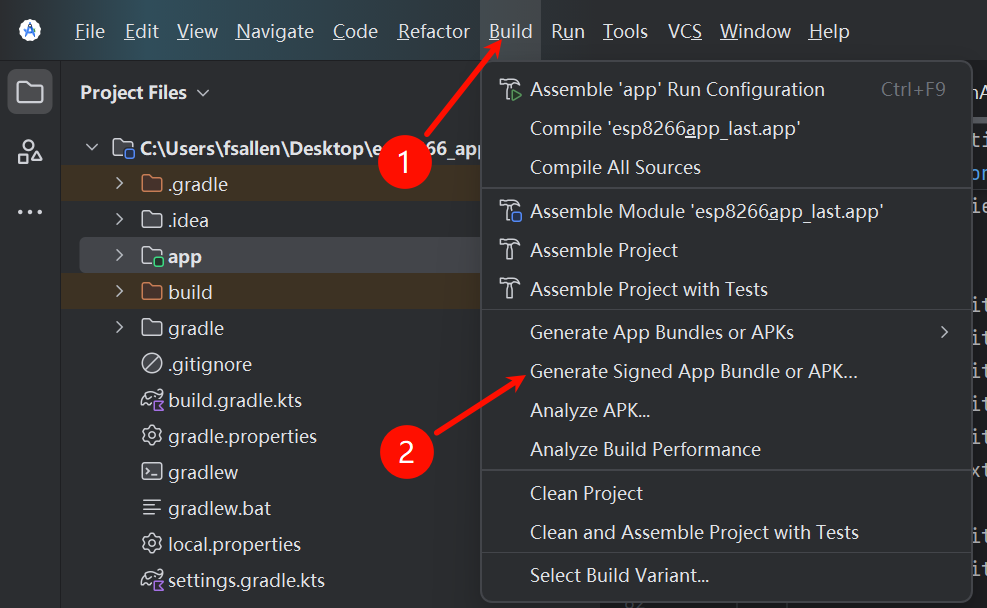
- 点击顶部菜单栏 Build。
- 选择 Generate Signed Bundle / APK...。
- 选中 APK,然后点击 Next。
第2步:创建签名文件 (KeyStore)
如果你是第一次做,需要新建一个“身份证”(签名文件):
- 在 "Key store path" 下方点击 Create new...。
- Key store path: 点击文件夹图标,选择保存位置(比如桌面),并起个文件名(比如
my_key.jks)。 - Password (两处): 设置一个密码(比如
123456),这是保护这个文件的。 - Key -> Alias: 默认
key0即可。 - Key -> Password (两处): 设置密码(通常和上面那个设成一样的,方便记,比如
123456)。 - Certificate: 第一行
First and Last Name随便填个名字(比如fsallen),其他行可以空着。 - 点击 OK。
第3步:生成
- 回到原来的界面,刚才填的信息应该自动补全了,点击 Next。
- 在 Build Variants 里选择 release (发布版)。
- 点击 Create (或 Finish)。
- 等待右下角提示 "Generate Signed APK: ... successfully"。

(等待生成成功提示)- 点击提示框里的 locate。
- 文件夹里的
app-release.apk就是你的最终成果!
二次开发推荐学习
- 学习使用图片控件
- 学习使用线性布局
- 服务器信息,客户端id,用户名,密码可以写死,不需要放在屏幕上去显示
- 理解在哪接受信息
- 使用java解析接受的信息,根据解析的信息处理逻辑
- 学会使用多线程
- 本视频参考,在这里向大佬阿正啷个哩个啷表示感谢:【7天Java0基础速成安卓开发】Day1 Android工程代码是怎么运行的
- 推荐课程:(学完必会)Android studio基础,从入门到精通,学完小白也能会